Showing posts with label xamarin. Show all posts

Tuesday, April 18, 2017

Hands on Xamarin Platform Pipeline - Build - Setup automatic build on git push

In this article I'll show you how to setup the automatic build of our 'RememberIt' application after every git push using Visual Studio Mobile Center.

The automatic building of the application will help to ensure that in a team of developers the application is always building successfully and is available for distribution. When the build is broken, it can be seen and solved quickly.

If not yet done, please read the previous post in the Hands on Xamarin Platform Pipeline series.

To start, browse to Visual Studio Mobile Center then select the application we created on the previous post.

Select Build menu, the supported version control system are:
- Visual Studio Team Services
- Github
- Bitbucket
In our case, we'll use Github.
Authorize Mobile Center to access to your Github repositories.
Select the repository where 'RememberIt' application is hosted.
Select the desired branch, in our case it's the master branch.
Now, select the connected application project, then:
- Select Debug or Release configuration
- Activate Build on push option in order to build the project on every available push
Activate the Sign builds option in order to sign the application after the build. 
In this case, we need to provide the keystore. We'll use the debug keystore which is automatically generated.
Select the keystore in: '~/.local/share/Xamarin/Mono for Android/debug.keystore'
Keystore password: android
Key Alias: androiddebugkey
Key password: android
The first Build is queued waiting for an available machine to start the build. We can eventually fire a manual build by pushing 'Build now' button.
In the console we can see the build progress.
And after some unsuccessful builds and adjustments in the code. We will be able to see a successful build.
We will be able to either distribute the application or download the generated apk as well as the build logs.

See you soon.

Wednesday, April 12, 2017

Hands on Xamarin Platform Pipeline - Develop - Add Facebook authentication

In this article I'll show you how to add Facebook authentication to the "RememberIt" mobile application.

If not yet done, please read the previous post in the Hands on Xamarin Platform Pipeline series.

Facebook app creation

In order to be able to add Facebook authentication, we need to create a Facebook App. To do this, navigate to: https://developers.facebook.com/apps, click on "Add a New App" button then fill in the application information.
Go to Settings then copy the App ID.
Then always in Settings, click on Add Platform then Select Android.
Fill in the following information:
- Google Play Package Name: the package name defined in Android Manifest file.
- Class Name: MainActivity in our case.
- Key Hashes: where we can add Debug and Release Android key hashes. To generate the Debug Key hash, open the terminal then run the command below:
Use 'android' as password then copy-paste the generated hash key.
Now, click on Add Product under Products category then choose Facebook Login.
Now, activate all the OAuth parameters and use the URL: https://www.facebook.com/connect/login_success.html as Valid OAuth redirect URL.
Finally, we can make our Facebook application public under App Review menu as shown below.

Add Facebook authentication to RememberIt application

For this, we will use the great Xamarin Component Xamarin.Auth, for more details you can check the official documentation.

Within the project, double click on Components then search for Xamarin.Auth.

Click on 'Add to App', once installed we can browse some samples as well as the documentation directly on Xamarin IDE.
Now, within the project double click on References then add the assembly System.Json.
Modify the manifest file to add internet permission and app_id meta data as presented below.

Open the Main.axml layout then add the facebook button.

On the MainActivity class create a static TaskScheduler for UI.

Then, create a method LoginToFacebook that will perform all the job. Below the documented source code of the method:

Now, all we need to do is to wire the method to the button click, add the following code in the OnCreate method:

Build, Deploy and ...


Complete source code is available on GitHub.

See you soon!

Saturday, April 8, 2017

Hands on Xamarin Platform Pipeline - Develop - Exploring Visual Studio Mobile Center

In this post we'll explore the functionalities of the Visual Studio Mobile Center, it's just an overview and each functionality will be detailed in future posts while improving our 'RememberIt' application.

Don't forget to take a look at the previous posts.

Visual Studio Mobile Center helps mobile developers to cover all the lifecycle (Continuous Integration and Continuous Delivery) and the functionalities they need for a mobile application. It's available under the following link: https://mobile.azure.com

Application creation

Let's create our 'RememberIt' application is Visual Studio Mobile Center. Firstly, login to https://mobile.azure.com, then push 'Add new app' button.
Enter app name and for our 'RememberIt' application select Android as OS, Xamarin as platform then push 'Add new app' button.
Once the application created, the getting started page is shown.

Exploring Visual Studio Mobile Center menus

Build menu: to retrieve the code from either GitHub repository or Bitbucket then configure an automatic build of the project.
Test menu: it's for UI automation tests, we can chose the device configuration and plan UI testing after the build step.
Distribute menu: for distribution and where we can define group of testers and configure an automatic distribution to that group after a successful build.
Tables menu: is for managing the storage of the mobile application. 
Identity menu: is for adding authentication to the mobile application and the following providers are supported:
- Azure Active Directory
- Microsoft account
- Facebook
- Google
- Twitter
Crashes menu: is for crash data browsing of the mobile application.
Analytics menu: is for mobile application analytics data browsing.

Wednesday, April 5, 2017

Hands on Xamarin Platform Pipeline - Develop - Let's explore some nice features of Xamarin Studio 6

This is not the post that logically follows the the previous one but I suggest to read it. In this post we'll take a break and explore some nice features of Xamarin Studio 6.

General functionalities

Dark theme is one of the new features, in preferences then Visual Style.
We can configure the desired code formatting between Visual Studio Style, Mono Style or Custom Style. To do this: preference, source code, code formatting then Text file where we can define the Policy, use 4 spaces instead of tabs... Just make sure to have the other types (XML, F# and C#) use the default behavior of Text file.
Global Search can be used to search for everything inside the workspace: files, Xamarin Studio functionalities & commands...
When we copy a piece of code, it will be saved in the clipboard inside the toolbox. This piece of code can be dragged and dropped to a source code file.
When we search for something we can pin the results to save them and do other searches.
We can highlight the current line, show invisible characters (like spaces for example).
We can go to a declaration just by hovering it using the cursor and Command+D keys or mouse clicking and Command key. Also, we can use the next-back buttons to navigate next and back.
We can have multiple windows in case we work in multiple monitors. Just drag the document outside the IDE.

We can also have a side by side view for comparison needs for example, just drag the document.

Code completion and analysis

Thanks to Roslyn processor, the code completion becomes asynchronous as well as live code analysis that shows up: warnings in orange and hints in green color.
Select the warning and the hint then hit Alt+Enter to see suggestions about the solution.

Activate fix imports option in order to have the imports added automatically while writing the code.

Refactoring options

alt-up down to move the current line.
We can also select by logical scope using alt-shift up down then alt-enter to have refactoring suggestions.


Please note that we can create a bug in Xamarin Studio BugTracker as well as suggest new functionalities in Uservoice.

Monday, April 3, 2017

Hands on Xamarin Platform Pipeline - Develop - Add authentication using Azure Active Directory

After creating an offline application following the previous post.

Now, we will start convert our offline application to a connected one using Microsoft Azure tools. In this post we'll add authentication using Azure Active Directory.

Application Creation on Azure Active Directory

To do this, login to https://manage.windowsazure.com and in case you don't have Azure Subscription a trial can be requested. Then, click on Active Directory as shown in the image below.
Select an Active Directory, navigate to Applications tab, click ‘Add‘ button then select ‘Add an application my organization is developing‘.
Choose an application name and make sure to select ‘Native Client Application‘ as type of application.
On the final screen, provide the ‘Redirect URI‘ then validate the application creation.
Once the app is created, navigate to ‘Configure‘ tab then write down the ‘Client ID’ that we’ll use later.

User Creation on Active Directory

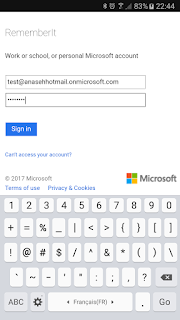
In Active Directory main screen, navigate to Users tab, click on Add User button then chose a user name, in my case the user name shall be: test@anasehhotmail.onmicrosoft.com
Fill in some information about the user.
At the last step generate a temporary password that we can use for the first authentication in order to chose the final password.

Update the mobile Application

Add the package named Azure Active Directory Authentication Library (Azure ADAL) to the application.
Add a button to the Main.axml layout, we can use the Android graphical designer.
In the MainActivity class add the following constants.

Now, invoke the authentication process then save the result to authResult variable.

Finally, override the OnActivityResult method to get the authentication result.

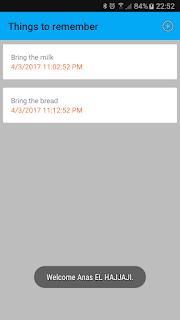
Below some screenshots.
 

Complete source code can be found on Github.

See you soon!