Hands on Xamarin Platform Pipeline - Develop - Add authentication using Azure Active Directory - Hallo sahabat Google Android Developer Tutorial, Pada Artikel yang anda baca kali ini dengan judul Hands on Xamarin Platform Pipeline - Develop - Add authentication using Azure Active Directory, kami telah mempersiapkan artikel ini dengan baik untuk anda baca dan ambil informasi didalamnya. mudah-mudahan isi postingan
Artikel active-directory,
Artikel adal,
Artikel android,
Artikel authentication,
Artikel azure,
Artikel oauth,
Artikel xamarin, yang kami tulis ini dapat anda pahami. baiklah, selamat membaca.
Judul : Hands on Xamarin Platform Pipeline - Develop - Add authentication using Azure Active Directory
link : Hands on Xamarin Platform Pipeline - Develop - Add authentication using Azure Active Directory
Anda sekarang membaca artikel Hands on Xamarin Platform Pipeline - Develop - Add authentication using Azure Active Directory dengan alamat link https://googleandroiddevelopertutorial.blogspot.com/2017/04/hands-on-xamarin-platform-pipeline_3.html
Judul : Hands on Xamarin Platform Pipeline - Develop - Add authentication using Azure Active Directory
link : Hands on Xamarin Platform Pipeline - Develop - Add authentication using Azure Active Directory
Hands on Xamarin Platform Pipeline - Develop - Add authentication using Azure Active Directory
After creating an offline application following the previous post.


Complete source code can be found on Github.
See you soon!
Now, we will start convert our offline application to a connected one using Microsoft Azure tools. In this post we'll add authentication using Azure Active Directory.


Application Creation on Azure Active Directory
To do this, login to https://manage.windowsazure.com and in case you don't have Azure Subscription a trial can be requested. Then, click on Active Directory as shown in the image below.
Select an Active Directory, navigate to Applications tab, click ‘Add‘ button then select ‘Add an application my organization is developing‘.

Choose an application name and make sure to select ‘Native Client Application‘ as type of application.

On the final screen, provide the ‘Redirect URI‘ then validate the application creation.

Once the app is created, navigate to ‘Configure‘ tab then write down the ‘Client ID’ that we’ll use later.

User Creation on Active Directory
In Active Directory main screen, navigate to Users tab, click on Add User button then chose a user name, in my case the user name shall be: test@anasehhotmail.onmicrosoft.com

Fill in some information about the user.

At the last step generate a temporary password that we can use for the first authentication in order to chose the final password.

Update the mobile Application
Add the package named Azure Active Directory Authentication Library (Azure ADAL) to the application.

Add a button to the Main.axml layout, we can use the Android graphical designer.

In the MainActivity class add the following constants.
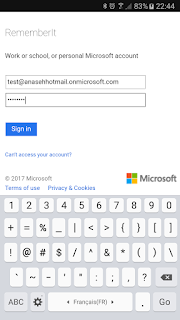
Now, invoke the authentication process then save the result to authResult variable.
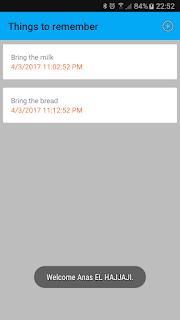
Finally, override the OnActivityResult method to get the authentication result.
Below some screenshots.


Complete source code can be found on Github.
See you soon!
Demikianlah Artikel Hands on Xamarin Platform Pipeline - Develop - Add authentication using Azure Active Directory
Sekianlah artikel Hands on Xamarin Platform Pipeline - Develop - Add authentication using Azure Active Directory kali ini, mudah-mudahan bisa memberi manfaat untuk anda semua. baiklah, sampai jumpa di postingan artikel lainnya.
Anda sekarang membaca artikel Hands on Xamarin Platform Pipeline - Develop - Add authentication using Azure Active Directory dengan alamat link https://googleandroiddevelopertutorial.blogspot.com/2017/04/hands-on-xamarin-platform-pipeline_3.html
Hands on Xamarin Platform Pipeline - Develop - Add authentication using Azure Active Directory
4/
5
Oleh
Unknown


3 comments
ReplyThank you.Well it was nice post and very helpful information on
Azure Online Course
UniteAR
ReplyUniteAR
YEAHHH!!!!THNK YOU FOR THIS BLOG VERY USEFULL FOR ME VERY INTERESTED TO READ THIS Azure Training in Chennai | Certification | Azure Online Training Course | Azure Training in Bangalore | Certification | Azure Online Training Course | Azure Training in Hyderabad | Certification | Azure Online Training Course | Azure Training in Pune | Certification | Azure Online Training Course | Azure Training | microsoft azure certification | Azure Online Training Course
Reply