Android UI Layout Tutorial - Hallo sahabat Google Android Developer Tutorial, Pada Artikel yang anda baca kali ini dengan judul Android UI Layout Tutorial , kami telah mempersiapkan artikel ini dengan baik untuk anda baca dan ambil informasi didalamnya. mudah-mudahan isi postingan
Artikel Android UI layout tutorial, yang kami tulis ini dapat anda pahami. baiklah, selamat membaca.
Judul : Android UI Layout Tutorial
link : Android UI Layout Tutorial
Android Screen UI Layouts

2.Check the main.xml code in .resource folder by default it will have the code listed below

The default orientation of LinearLayout is set to horizontal. If you want to change its orientation to vertical, set the orientation attribute to vertical, like this:

Figure 5 shows the positioning of the views as well as their heights. The layout_gravity attribute indicates the positions the views should gravitate towards, while the layout_weight attribute specifies the distribution of available space. In the preceding example, the three buttons occupy about 16.6% (1/(1+2+3) * 100), 33.3% (2/(1+2+3) * 100), and 50% (3/(1+2+3) *100) of the available height, respectively.If you change the orientation of the LinearLayout to horizontal, you need to change the width of each view to 0 dp, and the views will be displayed as shown in Figure 6

AbsoluteLayout
</AbsoluteLayout>


android:layout_gravity is used position the component within the alloted grid eg:left/top,right/botton etc
Anda sekarang membaca artikel Android UI Layout Tutorial dengan alamat link https://googleandroiddevelopertutorial.blogspot.com/2012/09/android-ui-layout-tutorial.html
Judul : Android UI Layout Tutorial
link : Android UI Layout Tutorial
Android UI Layout Tutorial
Android Screen UI Layouts
What is a Layout?
Your layout is the architecture for the user interface in an Activity. It defines the layout structure and holds all the visual elements that appear to the user.
Two Options to declare a Layout
• Option #1: Declare UI elements in XML (most common and preferred)
• Option #2: Instantiate layout elements at runtime (programmatically in Java code)
Advantages of Declaring UI in XML
Separation of the presentation from the code that controls its behavior. You can modify UI without having to modify your source code and recompile. For example, you can create XML layouts for different screen orientations, different device screen sizes, and different languages Easier to visualize the structure of your UI (without writing any code) Easier to design/debug UI Visualizer tool (like the one in Eclipse IDE)
A layout specifies a hierarchical tree structure of ViewGroup and View elements > A ViewGroup is considered as a branch A View is considered as leaf A layout file must contain exactly one root element, which must be one of the following
ViewGroup element (i.e., LinearLayout) - typical
View element (Button, for example)
A ViewGroup element can have child elements, which themselves can be ViewGroup or View elements.An Activity displays the user interface of your application, which may contain widgets like buttons, labels, text boxes, etc. Typically, you define your UI using an XML file (for example, the activity_main.xml file located in the res/layout folder), which may look like this:
<?xml version="1.0" encoding="utf-8"?>
<LinearLayout xmlns:android="http://schemas.android.com/apk/res/android"
android:orientation="vertical"
android:layout_width="fill_parent"
android:layout_height="fill_parent"
>
<TextView
android:layout_width="fill_parent"
android:layout_height="wrap_content"
android:text="@string/hello"
/>
</LinearLayout>
During runtime, you load the XML UI in the onCreate() event handler in your Activity class, using the setContentView()method of the Activity class:
@Override
public void onCreate(Bundle savedInstanceState) {
super.onCreate(savedInstanceState);
setContentView(R.layout.main);
}
What happens is that during compilation time, each element in the XML file is compiled into its equivalent Android GUI class, with attributes represented by methods. The Android system then creates the UI of the Activity when it is loaded.While it is always easier to build your UI using a XML file, there are times where you need to build your UI dynamically during runtime (for example, when writing games). Hence, it is also possible to create your UI entirely using code.
Android supports the following ViewGroups:
- LinearLayout
- AbsoluteLayout
- TableLayout
- RelativeLayout
- FrameLayout
- ScrollView
The following sections will discuss each ViewGroup in more details. Note that in practice, it is common to nest different types of layouts to create the UI you want.
LinearLayout
The LinearLayout arranges views in a single column or single row. Child views can either be arranged vertically or horizontally. To see how LinearLayout works, let's modify the main.xml file in the project:
<?xml version="1.0" encoding="utf-8"?>
<LinearLayout xmlns:android="http://schemas.android.com/apk/res/android"
android:orientation="vertical"
android:layout_width="fill_parent"
android:layout_height="fill_parent"
>
<TextView
android:layout_width="fill_parent"
android:layout_height="wrap_content"
android:text="@string/hello"
/>
</LinearLayout>
In the main.xml file, observe that the root element is <LinearLayout> and it has a <TextView> element contained within it. The <LinearLayout> element controls the order in which the views contained within it appear.
Each View and ViewGroup has a set of common attributes, some of which are shown in Table 1.
Attribute | Description |
layout_width | Specifies the width of the View or ViewGroup |
layout_height | Specifies the height of the View or ViewGroup |
layout_marginTop | Specifies extra space on the top side of the View or ViewGroup |
layout_marginBottom | Specifies extra space on the bottom side of the View or ViewGroup |
layout_marginLeft | Specifies extra space on the left side of the View or ViewGroup |
layout_marginRight | Specifies extra space on the right side of the View or ViewGroup |
layout_gravity | Specifies how child Views are positioned |
layout_weight | Specifies how much of the extra space in the layout to be allocated to the View |
layout_x | Specifies the x-coordinate of the View or ViewGroup |
layout_y | Specifies the y-coordinate of the View or ViewGroup |
Table 1 Common attributes of views and viewgroups
UNITS OF MEASUREMENT
When specifying the size of an element on an Android UI, you should be aware of the following units of measurement:
dp — Density-independent pixel. 1 dp is equivalent to one pixel on a 160 dpi screen. This is the recommended unit of measurement when specifying the dimension of views in your layout. The 160 dpi screen is the baseline density assumed by Android. You can specify either “dp” or “dip” when referring to a
density-independent pixel.
sp — Scale-independent pixel. This is similar to dp and is recommended for specifying font sizes.
pt — Point. A point is defi ned to be 1/72 of an inch, based on the physical screen size.
px — Pixel. Corresponds to actual pixels on the screen. Using this unit is not recommended, as your UI may not render correctly on devices with a different screen resolution.
Some of these attributes are applicable only when a View is in a specific ViewGroup. For example, the layout_weight and layout_gravity attributes are applicable only when a View is in either a LinearLayout or a TableLayout.
Here, you set the width of both the TextView and Button views to an absolute value. In this case, the width for the TextView is set to 100 density-independent pixels wide, and the Button to 160 density-independent pixels wide. Before you see how the views will look like on different screens with different pixel density, it is important to understand how Android recognizes screens of varying sizes and density. Figure 3-1 shows the screen of the Nexus S. It has a 4-inch screen (diagonally), with a screen width of 2.04 inches. Its resolution is 480 (width) _ 800 (height) pixels. With 480 pixels spread across a width of 2.04 inches, the result is a pixel density of about 235 dots per inch (dpi).As you can see from the fi gure, the pixel density of a screen varies according to screen size and resolution.
Android defines and recognizes four screen densities:
➤ Low density (ldpi) — 120 dpi
➤ Medium density (mdpi) — 160 dpi
➤ High density (hdpi) — 240 dpi
➤ Extra High density (xhdpi) — 320 dpi
Your device will fall into one of the densities defined in the preceding list. For example, the Nexus S is regarded as a hdpi device, as its pixel density is closest to 240 dpi. The HTC Hero, however, has a 3.2-inch (diagonal) screen size and a resolution of 320 _ 480. Its pixel density works out to be about 180 dpi. Therefore, it would be considered an mdpi device, as its pixel density is closest to 160 dpi.To test how the views defined in the XML fi le will look when displayed on screens of different densities, create two AVDs with different screen resolutions and abstracted LCD densities. Using the dp unit ensures that your views are always displayed in the right proportion regardless of the screen density — Android automatically scales the size of the view depending on the density of the screen. Using the Button as an example, if it is displayed on a 180 dpi screen (a 180 dpi screen is treated just like a 160 dpi screen), its width would be 160 pixels. However, if it is displayed on a 235 dpi screen (which is treated as a 240 dpi screen), then its width would be 240 pixels.
HOW TO CONVERT DP TO PX
The formula for converting dp to px (pixels) is as follows:
Actual pixels = dp * (dpi / 160), where dpi is either 120, 160, 240, or 320.Therefore, in the case of the Button on a 235 dpi screen, its actual width is 160* (240/160) = 240 px. When run on the 180 dpi emulator (regarded as a 160 dpidevice), its actual pixel is now 160 * (160/160) = 160 px. In this case, one dp isequivalent to one px.
Creating a Sample Project
1.Create Android project with details as listed in table below
Property name | Property value |
Project name | SRM_UILayoutTutorial |
Package name | in.ac.srmuniv.layouttutorial |
Activity name | MainActivity |
Layout xml name | activity_main |
<?xml version="1.0"encoding="utf-8"?>
<LinearLayout xmlns:android="http://schemas.android.com/apk/res/android"
android:layout_width="fill_parent"
android:layout_height="fill_parent"
android:orientation="vertical" >
<TextView
android:layout_width="fill_parent"
android:layout_height="wrap_content"
android:text="@string/hello" />
<Button
android:layout_width="160dp"
android:layout_height="wrap_content"
android:onClick="onClick"
android:text="Button" />
</LinearLayout>

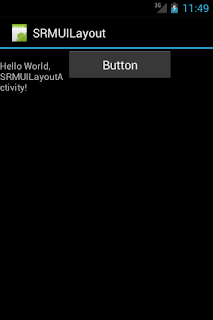
Figure 1 A Simple Linear Layout
2.Modify the main.xml as shown below and view the result in Android Layout Editor
<TextView
android:layout_width="wrap_content"
android:layout_height="wrap_content"
android:text="@string/hello" /> The width of the <TextView> element fills the entire width of its parent (which is the screen in this case) using the fill_parent constant. Its height is indicated by the wrap_content constant, which means that its height is the height of its content (in this case, the text contained within it). If you don’t want the <TextView> view to occupy the entire row, you can set its layout_width attribute to wrap_content.
Consider the following layout:
3.Modify the main.xml as shown below and view the result in Android Layout Editor
<?xml version="1.0"encoding="utf-8"?>
<LinearLayout xmlns:android="http://schemas.android.com/apk/res/android"
android:layout_width="fill_parent"
android:layout_height="fill_parent" >
<TextView
android:layout_width="100dp"
android:layout_height="wrap_content"
android:text="@string/hello" />
<Button
android:layout_width="160dp"
android:layout_height="wrap_content"
android:text="Button" />
</LinearLayout>

Figure 2 Views with Absolute Values
The default orientation of LinearLayout is set to horizontal. If you want to change its orientation to vertical, set the orientation attribute to vertical, like this:
6. Modify the main.xml as shown below and view the result in Android Layout Editor
<LinearLayout xmlns:android="http://schemas.android.com/apk/res/android"
android:layout_width="fill_parent"
android:layout_height="fill_parent"
android:orientation="vertical">
Figure 4 Changing the orientation to vertical
In LinearLayout, you can apply the layout_weight and layout_gravity attributes to views contained within it, as the following modifications to main.xml shows:
7.Modify the main.xml as shown below and view the result in Android Layout Editor
In LinearLayout, you can apply the layout_weight and layout_gravity attributes to views
contained within it, as the following modifications to main.xml show:
<LinearLayout xmlns:android="http://schemas.android.com/apk/res/android"
android:layout_width="fill_parent"
android:layout_height="fill_parent"
android:orientation="vertical" >
<Button
android:layout_width="160dp"
android:layout_height="wrap_content"
android:layout_gravity="left"
android:layout_weight="1"
android:id="@+id/button"
android:text="Button" /> <Button
android:layout_width="160dp"
android:layout_height="wrap_content"
android:layout_gravity="center"
android:layout_weight="2"
android:id="@+id/button1"
android:id="@+id/button1"
android:text="Button" />
<Button
android:layout_width="160dp"
android:layout_height="wrap_content"
android:layout_gravity="right"
android:layout_weight="3"
android:id="@+id/button2"
android:id="@+id/button2"
android:text="Button" />
</LinearLayout>
Figure 5 Applying the layout_weight and Layout gravity
Figure 5 shows the positioning of the views as well as their heights. The layout_gravity attribute indicates the positions the views should gravitate towards, while the layout_weight attribute specifies the distribution of available space. In the preceding example, the three buttons occupy about 16.6% (1/(1+2+3) * 100), 33.3% (2/(1+2+3) * 100), and 50% (3/(1+2+3) *100) of the available height, respectively.If you change the orientation of the LinearLayout to horizontal, you need to change the width of each view to 0 dp, and the views will be displayed as shown in Figure 6
Figure 6 Linear Layout with gravity and weight applied on views
The AbsoluteLayout lets you specify the exact location of its children. Consider the following UI defined in main.xml:
8. Modify the main.xml as shown below and view the result in Android Layout Editor
<?xml version="1.0"encoding="utf-8"?>
<AbsoluteLayout xmlns:android="http://schemas.android.com/apk/res/android"
android:layout_width="fill_parent"
android:layout_height="fill_parent" >
<Button
android:layout_width="188px"
android:layout_height="wrap_content"
android:layout_x="126px"
android:layout_y="361px"
android:id="@+id/button"
android:text="Button" />
<Button
android:layout_width="113px"
android:layout_height="wrap_content"
android:layout_x="12px"
android:layout_y="361px"
android:id="@+id/button1"
android:id="@+id/button1"
android:text="Button" />
Figure 6 shows the two Button views located at their specified positions using the android_layout_x and android_layout_y attributes.

Figure 6 Views laid out using AbsoluteLayout
Note:You should ideally use AbsoluteLayout when you need to reposition your views when there is a change in the screen rotation.
TableLayout
The TableLayout groups views into rows and columns. You use the <TableRow> element to designate a row in the table. Each row can contain one or more views. Each view you place within a row forms a cell. The width for each column is determined by the largest width of each cell in that column.
9..Modify the main.xml as shown below and view the result in Android Layout Editor
<?xml version="1.0"encoding="utf-8"?>
<TableLayout xmlns:android="http://schemas.android.com/apk/res/android"
android:layout_width="fill_parent"
android:layout_height="fill_parent"
android:background="#000044" >
<TableRow>
<TextView
android:text="User Name:"
android:width="120px"/>
<EditText
android:id="@+id/txtUserName"
android:width="200px" />
</TableRow>
<TableRow>
<TextView android:text="Password:"/>
<EditText
android:id="@+id/txtPassword"
android:password="true" />
</TableRow>
<TableRow>
<TextView />
<CheckBox
android:id="@+id/chkRememberPassword"
android:layout_width="fill_parent"
android:layout_height="wrap_content"
android:text="Remember Password" />
</TableRow>
<TableRow>
<Button
android:id="@+id/buttonSignIn"
android:id="@+id/button"
android:text="Log In" />
</TableRow>
</TableLayout>

Figure 7 Using the TableLayout
Note that in the above example, there are two columns and four rows in the TableLayout. The cell directly under the Password TextView is populated with an empty element. If you don't do this, the Remember Password checkbox will then appear under the Password TextView, like that shown in Figure 8.

Figure 8 Note the change in the position of the Remember Password view
10.Modify the main.xml as shown below and view the result in Android Layout Editor
RelativeLayout
The RelativeLayout lets you specify how child views are positioned relative to each other. Consider the following main.xmlfile:
The RelativeLayout lets you specify how child views are positioned relative to each other. Consider the following main.xmlfile:
<?xml version="1.0"encoding="utf-8"?>
<RelativeLayout xmlns:android="http://schemas.android.com/apk/res/android"
android:id="@+id/RLayout"
android:layout_width="fill_parent"
android:layout_height="fill_parent" >
<TextView
android:id="@+id/lblComments"
android:layout_width="wrap_content"
android:layout_height="wrap_content"
android:layout_alignParentLeft="true"
android:layout_alignParentTop="true"
android:text="Comments" />
<EditText
android:id="@+id/txtComments"
android:layout_width="fill_parent"
android:layout_height="170px"
android:layout_alignLeft="@+id/lblComments"
android:layout_below="@+id/lblComments"
android:layout_centerHorizontal="true"
android:textSize="18sp" />
<Button
android:id="@+id/btnSave"
android:layout_width="125px"
android:layout_height="wrap_content"
android:layout_alignRight="@+id/txtComments"
android:layout_below="@+id/txtComments"
android:text="Save" />
<Button
android:id="@+id/btnCancel"
android:layout_width="124px"
android:layout_height="wrap_content"
android:layout_alignLeft="@+id/txtComments"
android:layout_below="@+id/txtComments"
android:text="Cancel" />
</RelativeLayout>
Notice that each view embedded within the RelativeLayout have attributes that allow them to align with another view. These attributes are:
- layout_alignParentTop
- layout_alignParentLeft
- layout_alignLeft
- layout_alignRight
- layout_below
- layout_centerHorizontal
The value for each of these attributes is the ID for the view that you are referencing. The above XML UI creates the screen shown in Figure 9.

Figure 9 Using RelativeLayout to layout views
FrameLayout
The FrameLayout is a placeholder on screen that you can use to display a single view. Views that you add to aFrameLayout is always anchored to the top left of the layout.
11 Modify the main.xml as shown below and view the result in Android Layout Editor
<?xml version="1.0"encoding="utf-8"?>
<RelativeLayout xmlns:android="http://schemas.android.com/apk/res/android"
android:id="@+id/widget68"
android:layout_width="fill_parent"
android:layout_height="fill_parent" >
<FrameLayout
android:layout_width="wrap_content"
android:layout_height="wrap_content"
android:layout_x="40px"
android:layout_y="35px" >
<ImageView
android:layout_width="wrap_content"
android:layout_height="wrap_content"
android:src="@drawable/me" />
</FrameLayout>
</RelativeLayout>
Here, you have a FrameLayout within an AbsoluteLayout. Within the FrameLayout, you embed an ImageView view. The UI is as shown in Figure 10.
Note: This example assumes that the res/drawable folder has an image named me.png.
Figure 10 Using FrameLayout
If you add another view (such as a Button view) within the FrameLayout, the view will overlap the previous view (see also Figure 11):12. Modify the main.xml as shown below and view the result in Android Layout Editor
<?xml version="1.0"encoding="utf-8"?>
<RelativeLayout xmlns:android="http://schemas.android.com/apk/res/android"
android:id="@+id/layout"
android:layout_width="fill_parent"
android:layout_height="fill_parent" >
<FrameLayout
android:layout_width="wrap_content"
android:layout_height="wrap_content"
android:layout_x="40px"
android:layout_y="35px" >
<ImageView
android:layout_width="wrap_content"
android:layout_height="wrap_content"
android:src="@drawable/me" />
<Button
android:layout_width="124px"
android:id="@+id/button"
android:layout_height="wrap_content"
android:id="@+id/button1"
android:id="@+id/button1"
android:text="Print Picture" />
</FrameLayout>
</RelativeLayout>

Figure 11 Overlapping views
You can add multiple views to a FrameLayout, but each will stack on top of the previous one.
This is when you want to animate a series of images,with only one visible at a time.
ScrollView
A ScrollView is a special type of FrameLayout in that it allows users to scroll through a list of views that occupy more space than the physical display. The ScrollView can contain only one child view or ViewGroup, which normally is aLinearLayout.
Note: Do not use a ListView together with the ScrollView. The ListView is designed for showing a list of related information and is optimized for dealing with large lists.
The following main.xml content shows a ScrollView containing a LinearLayout, which in turn contains some Button and EditText views:
13. Modify the main.xml as shown below and view the result in Android Layout Editor
<?xml version="1.0"encoding="utf-8"?>
<ScrollView xmlns:android="http://schemas.android.com/apk/res/android"
android:id="@+id/widget54"
android:layout_width="fill_parent"
android:layout_height="fill_parent" >
<LinearLayout
android:layout_width="310px"
android:layout_height="wrap_content"
android:orientation="vertical" >
<Button
android:id="@+id/button1"
android:layout_width="fill_parent"
android:layout_height="wrap_content"
android:text="Button 1" />
<Button
android:id="@+id/button2"
android:layout_width="fill_parent"
android:layout_height="wrap_content"
android:text="Button 2" />
<Button
android:id="@+id/button3"
android:layout_width="fill_parent"
android:layout_height="wrap_content"
android:text="Button 3" />
<EditText
android:id="@+id/txt"
android:layout_width="fill_parent"
android:layout_height="300px" />
<Button
android:id="@+id/button4"
android:layout_width="fill_parent"
android:layout_height="wrap_content"
android:text="Button 4" />
<Button
android:id="@+id/button5"
android:layout_width="fill_parent"
android:layout_height="wrap_content"
android:text="Button 5" />
</LinearLayout>
</ScrollView>
Figure 12 shows the ScrollView displaying a scroll bar on the right side of the screen. Users can drag the screen upward to reveal the views located at the bottom of the screen.


Figure 12 Using the ScrollView
GridViews
The layout needs to set up row column count each view will be fixed in the row column position android:layout_column and android:layout_row properties of the view associated to grid layout.android:layout_gravity is used position the component within the alloted grid eg:left/top,right/botton etc
<?xml version="1.0"encoding="utf-8"?>
<GridLayout xmlns:android="http://schemas.android.com/apk/res/android"
android:id="@+id/GridLayout1"
android:layout_width="match_parent"
android:layout_height="match_parent"
android:columnCount="3"
android:orientation="horizontal"
android:rowCount="2" >
<Button
android:id="@+id/button"
android:layout_column="0"
android:layout_gravity="left|top"
android:layout_row="0"
android:text="Button1" />
<Button
android:id="@+id/button1"
android:layout_column="2"
android:layout_gravity="left|top"
android:layout_row="0"
android:text="Button2" />
<Button
android:id="@+id/button2"
android:layout_column="0"
android:layout_gravity="left|top"
android:layout_row="1"
android:text="Button3" />
<Button
android:id="@+id/button3"
android:layout_column="2"
android:layout_gravity="left|top"
android:layout_row="1"
android:onClick="goNext"
android:text="Button4" />
<Space
android:layout_width="100dp"
android:layout_height="100dp"
android:layout_column="1"
android:layout_gravity="left|top"
android:layout_row="0" />
<Space
android:layout_width="100dp"
android:layout_height="100dp"
android:layout_column="1"
android:layout_gravity="left|top"
android:layout_row="1" />
</GridLayout>
Copy the code in MainActivity.java. Activity.
package in.ac.srmuniv.layouttutorial;
importandroid.app.Activity;
importandroid.content.Intent;
import android.os.Bundle;
import android.view.View;
importandroid.view.View.OnClickListener;
importandroid.widget.Button;
importandroid.widget.Toast;
public class MainActivity extends Activity implements OnClickListener {
/** Called when the activity is first created. */
private Button b1,b2,b3;
@Override
public void onCreate(Bundle savedInstanceState) {
super.onCreate(savedInstanceState);
setContentView(R.layout.activity_main);
b1=(Button)findViewById(R.id.button);
myListener lis=new myListener();
b1.setOnClickListener(lis);
b2=(Button)findViewById(R.id.button1);
b2.setOnClickListener(new OnClickListener() {
@Override
public void onClick(View view) {
Toast.makeText(getApplicationContext(),
"Button 2 pressed",
Toast.LENGTH_LONG).show();
}
});
b3=(Button)findViewById(R.id.button3);
b3.setOnClickListener(this);
}
class myListener implements OnClickListener
{
@Override
public void onClick(View view) {
Toast.makeText(getApplicationContext(),
"Button 1 pressed",
Toast.LENGTH_LONG).show();
}
}
@Override
public void onClick(View v) {
Toast.makeText(getApplicationContext(),
"Button 3 pressed",
Toast.LENGTH_LONG).show();
}
public void goNext(View v) {
Toast.makeText(getApplicationContext(),
"Button 4 pressed",
Toast.LENGTH_LONG).show();
}
}
CODE EXPLANATION
The code presents us three different ways to bind listeners to the views.In this case buttonview is binded to onClickListener.Button1 binds onClickListener through inner class approach.Here Mylistener inner class implements onClickListener interface and implements onClick() method.Object of Mylistener class is blinded to button1 by the code given below.
myListener lis=new myListener();
b1.setOnClickListener(lis);
Button1 uses annoymous inner class approach binding onClickListener which can be generated by auto code complete feature of eclipse IDE.A commonly used coding strategy for implementing listener.
b2.setOnClickListener(new OnClickListener() {
@Override
public void onClick(View view) {
Toast.makeText(getApplicationContext(),
"Button 1 pressed",
Toast.LENGTH_LONG).show();
}
});
Button2 binds onClickListener through common approach the Activity class itself implementing onClickListener
b3.setOnClickListener(this);
Button2 is an Android specific approach for binding listeners.You have to enter the name of the function that will be called when an event is fired.This is done in the properties of the particular view in layout xml file associated to the Activity.The Activity class file has to implement the method with same name as listed in view properties.
public void goNext(View v) {
Toast.makeText(getApplicationContext(),
"Button 3 pressed",
Toast.LENGTH_LONG).show();
}
<Button
android:id="@+id/button4"
android:layout_column="2"
android:layout_gravity="left|top"
android:layout_row="1"
android:onClick="goNext"
android:text="Button4" />Demikianlah Artikel Android UI Layout Tutorial
Sekianlah artikel Android UI Layout Tutorial kali ini, mudah-mudahan bisa memberi manfaat untuk anda semua. baiklah, sampai jumpa di postingan artikel lainnya.
Anda sekarang membaca artikel Android UI Layout Tutorial dengan alamat link https://googleandroiddevelopertutorial.blogspot.com/2012/09/android-ui-layout-tutorial.html
Android UI Layout Tutorial
4/
5
Oleh
Unknown


