Hands on Xamarin Platform Pipeline - Develop - Let's start by an offline application - Hallo sahabat Google Android Developer Tutorial, Pada Artikel yang anda baca kali ini dengan judul Hands on Xamarin Platform Pipeline - Develop - Let's start by an offline application, kami telah mempersiapkan artikel ini dengan baik untuk anda baca dan ambil informasi didalamnya. mudah-mudahan isi postingan
Artikel android,
Artikel xamarin, yang kami tulis ini dapat anda pahami. baiklah, selamat membaca.
Judul : Hands on Xamarin Platform Pipeline - Develop - Let's start by an offline application
link : Hands on Xamarin Platform Pipeline - Develop - Let's start by an offline application
Anda sekarang membaca artikel Hands on Xamarin Platform Pipeline - Develop - Let's start by an offline application dengan alamat link https://googleandroiddevelopertutorial.blogspot.com/2017/03/hands-on-xamarin-platform-pipeline.html
Judul : Hands on Xamarin Platform Pipeline - Develop - Let's start by an offline application
link : Hands on Xamarin Platform Pipeline - Develop - Let's start by an offline application
Hands on Xamarin Platform Pipeline - Develop - Let's start by an offline application
After configuring the development environment following the previous post.
Deploy and...
Now, we'll be able to start developing mobile applications using Xamarin Platform.
In this post we'll start by creating the offline version of our "Remember It" application.
Application Creation
Open Xamarin Studio IDE, please note that I'm using dark theme because I'm fan of it and the default theme that comes after fresh Xamarin installation is the light theme.
Click on "New Solution..." button then select Android App.
Fill in the application Name, Organization Identifier. For the Target Platform I chose 'Maximum Compatibility' to cover multiple Android versions (since 2.3), and finally I chose AppCompat Light theme to bring Material Design to my Android application.
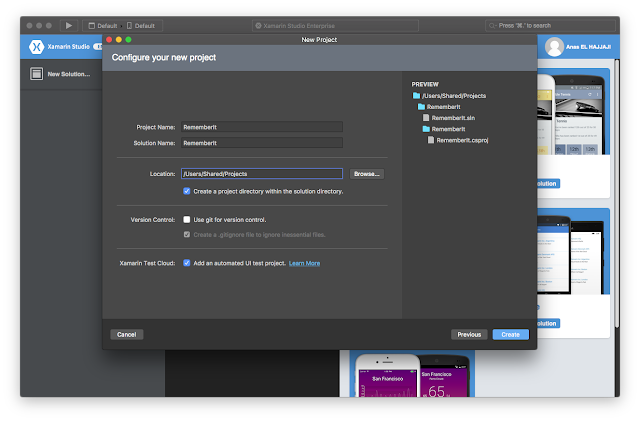
In the final step, we can set the project name, the solution name and the project location. I checked the Xamarin Test Cloud option in order to create UI Test project that we'll use after.
If you're getting build errors related to styles and theme, just make sure that Android Support V4 and V7 are correctly installed. Double click on Packages section within the project and add Android Support V4 and V7 as described bellow.
Now, the application should be built without any problem.
Android Emulator Creation
In Tools menu we can open the Google Emulator Manager.
Let's create a Nexus 6 emulator by filling some information about the device, choosing x86_64 as CPU is only to have faster emulator.
Now, we should be able to deploy applications to the created device.
We can start the device to verify whether it's working correctly.
Deploy the application to the device
Just select the new created device.
And push Play button, we'll get the Xamarin Hello World Application.
We can also put some breakpoints in the code to debug.
Create Login Screen
We can use the Android graphical designer to place UI components and change their properties.
Let's create the activity that will hold the list and come after the login step.
This file contains bidirectional Unicode text that may be interpreted or compiled differently than what appears below. To review, open the file in an editor that reveals hidden Unicode characters.
Learn more about bidirectional Unicode characters
using Android.App; | |
using Android.OS; | |
namespace RememberIt | |
{ | |
[Activity(Label = "Things to remember")] | |
public class RememberListActivity : Activity | |
{ | |
protected override void OnCreate(Bundle savedInstanceState) | |
{ | |
base.OnCreate(savedInstanceState); | |
SetContentView(Resource.Layout.RememberList); | |
} | |
} | |
} |
Create the corresponding empty layout for the moment.
This file contains bidirectional Unicode text that may be interpreted or compiled differently than what appears below. To review, open the file in an editor that reveals hidden Unicode characters.
Learn more about bidirectional Unicode characters
<?xml version="1.0" encoding="utf-8"?> | |
<LinearLayout xmlns:android="http://schemas.android.com/apk/res/android" | |
android:orientation="vertical" | |
android:layout_width="match_parent" | |
android:layout_height="match_parent" /> |
Now, once we click on 'LOGIN' button in Login screen, we should be able to go to the new created activity, the Main activity shall become as follows:
This file contains bidirectional Unicode text that may be interpreted or compiled differently than what appears below. To review, open the file in an editor that reveals hidden Unicode characters.
Learn more about bidirectional Unicode characters
using Android.App; | |
using Android.Widget; | |
using Android.OS; | |
namespace RememberIt | |
{ | |
[Activity(Label = "Welcome to Remember!", MainLauncher = true, Icon = "@mipmap/icon")] | |
public class MainActivity : Activity | |
{ | |
protected override void OnCreate(Bundle savedInstanceState) | |
{ | |
base.OnCreate(savedInstanceState); | |
// Set our view from the "main" layout resource | |
SetContentView(Resource.Layout.Main); | |
// Get our button from the layout resource, | |
// and attach an event to it | |
Button button = FindViewById<Button>(Resource.Id.myButton); | |
button.Click += delegate { StartActivity(typeof(RememberListActivity)); }; | |
} | |
} | |
} |
At this stage, we'll have the login screen as follows and once we click on login button we should be able to go to an empty screen.
Add toolbar and plus menu button to add elements
You can notice that the RememberListActivity does not contain the toolbar, let's add it.
First, we need to define some material colors and the theme under Resources/values/Styles.xml
This file contains bidirectional Unicode text that may be interpreted or compiled differently than what appears below. To review, open the file in an editor that reveals hidden Unicode characters.
Learn more about bidirectional Unicode characters
<?xml version="1.0" encoding="UTF-8" ?> | |
<resources> | |
<style name="AppTheme" parent="@style/Theme.AppCompat.Light.NoActionBar"> | |
<item name="android:colorPrimary">@color/primary</item> | |
<item name="android:colorPrimaryDark">@color/primary_dark</item> | |
<item name="android:colorAccent">@color/accent</item> | |
</style> | |
</resources> |
And material colors in Resources/values/Colors.xml
This file contains bidirectional Unicode text that may be interpreted or compiled differently than what appears below. To review, open the file in an editor that reveals hidden Unicode characters.
Learn more about bidirectional Unicode characters
<?xml version="1.0" encoding="utf-8"?> | |
<resources> | |
<color name="primary">#03A9F4</color> | |
<color name="primary_dark">#0288D1</color> | |
<color name="accent">#E040FB</color> | |
</resources> |
Finally, modify the Android manifest (Properties/AndroidManifest.xml) to choose the new theme.
This file contains bidirectional Unicode text that may be interpreted or compiled differently than what appears below. To review, open the file in an editor that reveals hidden Unicode characters.
Learn more about bidirectional Unicode characters
<application android:theme="@style/AppTheme" /> |
The toolbar can be added to the view in RememberList.axml
This file contains bidirectional Unicode text that may be interpreted or compiled differently than what appears below. To review, open the file in an editor that reveals hidden Unicode characters.
Learn more about bidirectional Unicode characters
<?xml version="1.0" encoding="utf-8"?> | |
<LinearLayout xmlns:android="http://schemas.android.com/apk/res/android" | |
xmlns:app="http://schemas.android.com/apk/res-auto" | |
android:orientation="vertical" | |
android:layout_width="match_parent" | |
android:layout_height="match_parent"> | |
<android.support.v7.widget.Toolbar | |
android:id="@+id/my_toolbar" | |
android:layout_width="match_parent" | |
android:layout_height="?attr/actionBarSize" | |
android:background="@color/primary" | |
android:elevation="4dp" | |
android:theme="@style/ThemeOverlay.AppCompat.ActionBar" | |
app:popupTheme="@style/ThemeOverlay.AppCompat.Light"/> | |
</LinearLayout> |
Now, create the menu in Resources/menu/MainMenu.xml
And, do some adjustments in the RememberListActivity
This file contains bidirectional Unicode text that may be interpreted or compiled differently than what appears below. To review, open the file in an editor that reveals hidden Unicode characters.
Learn more about bidirectional Unicode characters
using Android.App; | |
using Android.OS; | |
using Android.Support.V7.App; | |
using Android.Support.V7.Widget; | |
namespace RememberIt | |
{ | |
[Activity(Label = "Things to remember")] | |
public class RememberListActivity : AppCompatActivity | |
{ | |
protected override void OnCreate(Bundle savedInstanceState) | |
{ | |
base.OnCreate(savedInstanceState); | |
SetContentView(Resource.Layout.RememberList); | |
// Setup the toolbar | |
Toolbar myToolbar = (Toolbar)FindViewById(Resource.Id.my_toolbar); | |
SetSupportActionBar(myToolbar); | |
} | |
public override bool OnOptionsItemSelected(Android.Views.IMenuItem item) | |
{ | |
switch (item.ItemId) | |
{ | |
case Resource.Id.action_add: | |
return true; | |
default: | |
return base.OnOptionsItemSelected(item); | |
} | |
} | |
public override bool OnCreateOptionsMenu(Android.Views.IMenu menu) | |
{ | |
MenuInflater.Inflate(Resource.Menu.MainMenu, menu); | |
return base.OnCreateOptionsMenu(menu); | |
} | |
} | |
} |
Deploy and...
Create the "Remember It" list
We will use the Android RecyclerView and CardView, so we need to add the two components to the project.
The RememberList layout will become:
This file contains bidirectional Unicode text that may be interpreted or compiled differently than what appears below. To review, open the file in an editor that reveals hidden Unicode characters.
Learn more about bidirectional Unicode characters
<?xml version="1.0" encoding="utf-8"?> | |
<RelativeLayout xmlns:android="http://schemas.android.com/apk/res/android" | |
xmlns:app="http://schemas.android.com/apk/res-auto" | |
android:layout_width="match_parent" | |
android:layout_height="match_parent"> | |
<android.support.v7.widget.Toolbar | |
android:id="@+id/my_toolbar" | |
android:layout_width="match_parent" | |
android:layout_height="?attr/actionBarSize" | |
android:background="@color/primary" | |
android:elevation="4dp" | |
android:theme="@style/ThemeOverlay.AppCompat.ActionBar" | |
app:popupTheme="@style/ThemeOverlay.AppCompat.Light" /> | |
<android.support.v7.widget.RecyclerView | |
android:id="@+id/recyclerView" | |
android:layout_below="@+id/my_toolbar" | |
android:layout_width="match_parent" | |
android:layout_height="match_parent" /> | |
</RelativeLayout> |
Now, let's populate the recycler view and for this we'll start by creating the model class.
This file contains bidirectional Unicode text that may be interpreted or compiled differently than what appears below. To review, open the file in an editor that reveals hidden Unicode characters.
Learn more about bidirectional Unicode characters
using System; | |
namespace RememberIt | |
{ | |
public class RememberThing | |
{ | |
public string Name { get; set; } | |
public DateTime Deadline { get; set; } | |
public RememberThing() | |
{ | |
} | |
} | |
} |
Then, the RecyclerView element layout where we'll add our CardView.
This file contains bidirectional Unicode text that may be interpreted or compiled differently than what appears below. To review, open the file in an editor that reveals hidden Unicode characters.
Learn more about bidirectional Unicode characters
<?xml version="1.0" encoding="utf-8"?> | |
<android.support.v7.widget.CardView xmlns:android="http://schemas.android.com/apk/res/android" | |
xmlns:card_view="http://schemas.android.com/apk/res-auto" | |
android:id="@+id/cardview" | |
android:layout_width="match_parent" | |
android:layout_height="wrap_content" | |
card_view:cardUseCompatPadding="true" | |
card_view:cardElevation="5dp"> | |
<RelativeLayout | |
android:layout_width="match_parent" | |
android:layout_height="match_parent" | |
android:padding="16dp"> | |
<TextView | |
android:id="@+id/name" | |
android:layout_width="match_parent" | |
android:layout_height="wrap_content" | |
android:text="(name)" /> | |
<TextView | |
android:id="@+id/deadline" | |
android:layout_width="match_parent" | |
android:layout_height="wrap_content" | |
android:layout_below="@+id/name" | |
android:textColor="#fffa6a10" | |
android:text="(deadline)" /> | |
</RelativeLayout> | |
</android.support.v7.widget.CardView> |
We can also use the Android graphical designer for this.
We're almost done, we only need to update our activity to add the Adapter and the view holder.
This file contains bidirectional Unicode text that may be interpreted or compiled differently than what appears below. To review, open the file in an editor that reveals hidden Unicode characters.
Learn more about bidirectional Unicode characters
using System; | |
using System.Collections.Generic; | |
using Android.App; | |
using Android.OS; | |
using Android.Support.V7.App; | |
using Android.Support.V7.Widget; | |
using Android.Views; | |
using Android.Widget; | |
namespace RememberIt | |
{ | |
[Activity(Label = "Things to remember")] | |
public class RememberListActivity : AppCompatActivity | |
{ | |
RecyclerView recyclerView; | |
RecyclerView.LayoutManager layoutManager; | |
protected override void OnCreate(Bundle savedInstanceState) | |
{ | |
base.OnCreate(savedInstanceState); | |
SetContentView(Resource.Layout.RememberList); | |
// Setup the toolbar | |
Android.Support.V7.Widget.Toolbar myToolbar = (Android.Support.V7.Widget.Toolbar)FindViewById(Resource.Id.my_toolbar); | |
SetSupportActionBar(myToolbar); | |
// Initialize the recycler view | |
recyclerView = FindViewById<RecyclerView>(Resource.Id.recyclerView); | |
layoutManager = new LinearLayoutManager(this); | |
recyclerView.SetLayoutManager(layoutManager); | |
// Populate the list | |
PopulateList(); | |
} | |
public override bool OnOptionsItemSelected(Android.Views.IMenuItem item) | |
{ | |
switch (item.ItemId) | |
{ | |
case Resource.Id.action_add: | |
return true; | |
default: | |
return base.OnOptionsItemSelected(item); | |
} | |
} | |
public override bool OnCreateOptionsMenu(Android.Views.IMenu menu) | |
{ | |
MenuInflater.Inflate(Resource.Menu.MainMenu, menu); | |
return base.OnCreateOptionsMenu(menu); | |
} | |
/// <summary> | |
/// Populates the list. | |
/// </summary> | |
void PopulateList() | |
{ | |
// Let's create some dummy elements | |
RememberThing thing1 = new RememberThing(); | |
thing1.Name = "Bring the milk"; | |
thing1.Deadline = DateTime.Now.AddMinutes(10); | |
RememberThing thing2 = new RememberThing(); | |
thing2.Name = "Bring the bread"; | |
thing2.Deadline = DateTime.Now.AddMinutes(20); | |
List<RememberThing> rememberThings = new List<RememberThing>(); | |
rememberThings.Add(thing1); | |
rememberThings.Add(thing2); | |
recyclerView.SetAdapter(new RememberThingsAdapter(rememberThings)); | |
} | |
/// <summary> | |
/// The adapter. | |
/// </summary> | |
public class RememberThingsAdapter : RecyclerView.Adapter | |
{ | |
public List<RememberThing> RememberThings { get; set; } | |
public RememberThingsAdapter(List<RememberThing> rememberThings) | |
{ | |
RememberThings = rememberThings; | |
} | |
/// <summary> | |
/// The View Holder | |
/// </summary> | |
public class RememberThingsViewHolder : RecyclerView.ViewHolder | |
{ | |
TextView name; | |
TextView deadline; | |
public RememberThingsViewHolder(View view) : base(view) | |
{ | |
name = view.FindViewById<TextView>(Resource.Id.name); | |
deadline = view.FindViewById<TextView>(Resource.Id.deadline); | |
} | |
public void BindViewHolder(RememberThing rememberThing) | |
{ | |
name.Text = rememberThing.Name; | |
deadline.Text = rememberThing.Deadline.ToString(); | |
} | |
} | |
public override RecyclerView.ViewHolder OnCreateViewHolder(ViewGroup parent, int viewType) | |
{ | |
View view = LayoutInflater.From(parent.Context).Inflate(Resource.Layout.RememberThing, parent, false); | |
return new RememberThingsViewHolder(view); | |
} | |
public override void OnBindViewHolder(RecyclerView.ViewHolder holder, int position) | |
{ | |
RememberThing rememberThing = RememberThings[position]; | |
(holder as RememberThingsViewHolder).BindViewHolder(rememberThing); | |
} | |
public override int ItemCount | |
{ | |
get | |
{ | |
return RememberThings.Count; | |
} | |
} | |
} | |
} | |
} |
Deploy and...
Be able to add manually some "Remember It" elements
For this we need a dialog and to update the activity after pushing CREATE button.
This file contains bidirectional Unicode text that may be interpreted or compiled differently than what appears below. To review, open the file in an editor that reveals hidden Unicode characters.
Learn more about bidirectional Unicode characters
<?xml version="1.0" encoding="utf-8"?> | |
<LinearLayout xmlns:android="http://schemas.android.com/apk/res/android" | |
android:orientation="vertical" | |
android:layout_width="match_parent" | |
android:layout_height="match_parent" | |
android:layout_margin="10dp"> | |
<EditText | |
android:layout_width="match_parent" | |
android:layout_height="wrap_content" | |
android:id="@+id/editText1" | |
android:hint="Name" /> | |
<DatePicker | |
android:id="@+id/datePicker1" | |
android:layout_width="wrap_content" | |
android:layout_height="wrap_content" | |
android:datePickerMode="spinner" | |
android:calendarViewShown="false" /> | |
<TimePicker | |
android:id="@+id/timePicker1" | |
android:layout_width="wrap_content" | |
android:layout_height="wrap_content" | |
android:timePickerMode="spinner" /> | |
</LinearLayout> |
And finally, update the RememberListActivity.
This file contains bidirectional Unicode text that may be interpreted or compiled differently than what appears below. To review, open the file in an editor that reveals hidden Unicode characters.
Learn more about bidirectional Unicode characters
public override bool OnOptionsItemSelected(Android.Views.IMenuItem item) | |
{ | |
switch (item.ItemId) | |
{ | |
case Resource.Id.action_add: | |
CreateNewItem(); | |
return true; | |
default: | |
return base.OnOptionsItemSelected(item); | |
} | |
} | |
void CreateNewItem() | |
{ | |
View dialogView = LayoutInflater.Inflate(Resource.Layout.ItemCreate, null); | |
// Retrieve the components | |
EditText name = dialogView.FindViewById<EditText>(Resource.Id.editText1); | |
DatePicker datePicker = dialogView.FindViewById<DatePicker>(Resource.Id.datePicker1); | |
TimePicker timePicker = dialogView.FindViewById<TimePicker>(Resource.Id.timePicker1); | |
// Build the dialog | |
Android.Support.V7.App.AlertDialog.Builder builder = new Android.Support.V7.App.AlertDialog.Builder(this); | |
builder.SetPositiveButton("Create", (sender, e) => CommitCreation(name.Text, datePicker, timePicker)); | |
builder.SetNegativeButton("Cancel", (sender, e) => { }); | |
Android.Support.V7.App.AlertDialog dialog = builder.Create(); | |
dialog.SetView(dialogView); | |
dialog.Show(); | |
} | |
void CommitCreation(string name, DatePicker datepicker, TimePicker timepicker) | |
{ | |
RememberThing rememberThing = new RememberThing(); | |
rememberThing.Name = name; | |
int hours = 0; | |
int minutes = 0; | |
int seconds = 0; | |
// Init values | |
if (Build.VERSION.SdkInt >= BuildVersionCodes.M) | |
{ | |
hours = timepicker.Hour; | |
minutes = timepicker.Minute; | |
} | |
else | |
{ | |
hours = timepicker.CurrentHour.IntValue(); | |
minutes = timepicker.CurrentMinute.IntValue(); | |
} | |
rememberThing.Deadline = new DateTime(datepicker.DateTime.Year, datepicker.DateTime.Month, | |
datepicker.DateTime.Day, hours, minutes, seconds); | |
adapter.RememberThings.Insert(0, rememberThing); | |
adapter.NotifyItemInserted(0); | |
} |
Deploy and...
Full source code can be found on Github.
See you soon...
Demikianlah Artikel Hands on Xamarin Platform Pipeline - Develop - Let's start by an offline application
Sekianlah artikel Hands on Xamarin Platform Pipeline - Develop - Let's start by an offline application kali ini, mudah-mudahan bisa memberi manfaat untuk anda semua. baiklah, sampai jumpa di postingan artikel lainnya.
Anda sekarang membaca artikel Hands on Xamarin Platform Pipeline - Develop - Let's start by an offline application dengan alamat link https://googleandroiddevelopertutorial.blogspot.com/2017/03/hands-on-xamarin-platform-pipeline.html
Hands on Xamarin Platform Pipeline - Develop - Let's start by an offline application
4/
5
Oleh
Unknown