Showing posts with label android. Show all posts

Wednesday, April 12, 2017

Hands on Xamarin Platform Pipeline - Develop - Add Facebook authentication

In this article I'll show you how to add Facebook authentication to the "RememberIt" mobile application.

If not yet done, please read the previous post in the Hands on Xamarin Platform Pipeline series.

Facebook app creation

In order to be able to add Facebook authentication, we need to create a Facebook App. To do this, navigate to: https://developers.facebook.com/apps, click on "Add a New App" button then fill in the application information.
Go to Settings then copy the App ID.
Then always in Settings, click on Add Platform then Select Android.
Fill in the following information:
- Google Play Package Name: the package name defined in Android Manifest file.
- Class Name: MainActivity in our case.
- Key Hashes: where we can add Debug and Release Android key hashes. To generate the Debug Key hash, open the terminal then run the command below:
Use 'android' as password then copy-paste the generated hash key.
Now, click on Add Product under Products category then choose Facebook Login.
Now, activate all the OAuth parameters and use the URL: https://www.facebook.com/connect/login_success.html as Valid OAuth redirect URL.
Finally, we can make our Facebook application public under App Review menu as shown below.

Add Facebook authentication to RememberIt application

For this, we will use the great Xamarin Component Xamarin.Auth, for more details you can check the official documentation.

Within the project, double click on Components then search for Xamarin.Auth.

Click on 'Add to App', once installed we can browse some samples as well as the documentation directly on Xamarin IDE.
Now, within the project double click on References then add the assembly System.Json.
Modify the manifest file to add internet permission and app_id meta data as presented below.

Open the Main.axml layout then add the facebook button.

On the MainActivity class create a static TaskScheduler for UI.

Then, create a method LoginToFacebook that will perform all the job. Below the documented source code of the method:

Now, all we need to do is to wire the method to the button click, add the following code in the OnCreate method:

Build, Deploy and ...


Complete source code is available on GitHub.

See you soon!

Monday, April 3, 2017

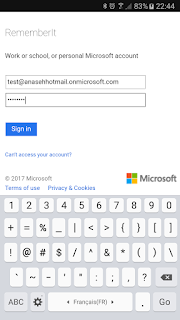
Hands on Xamarin Platform Pipeline - Develop - Add authentication using Azure Active Directory

After creating an offline application following the previous post.

Now, we will start convert our offline application to a connected one using Microsoft Azure tools. In this post we'll add authentication using Azure Active Directory.

Application Creation on Azure Active Directory

To do this, login to https://manage.windowsazure.com and in case you don't have Azure Subscription a trial can be requested. Then, click on Active Directory as shown in the image below.
Select an Active Directory, navigate to Applications tab, click ‘Add‘ button then select ‘Add an application my organization is developing‘.
Choose an application name and make sure to select ‘Native Client Application‘ as type of application.
On the final screen, provide the ‘Redirect URI‘ then validate the application creation.
Once the app is created, navigate to ‘Configure‘ tab then write down the ‘Client ID’ that we’ll use later.

User Creation on Active Directory

In Active Directory main screen, navigate to Users tab, click on Add User button then chose a user name, in my case the user name shall be: test@anasehhotmail.onmicrosoft.com
Fill in some information about the user.
At the last step generate a temporary password that we can use for the first authentication in order to chose the final password.

Update the mobile Application

Add the package named Azure Active Directory Authentication Library (Azure ADAL) to the application.
Add a button to the Main.axml layout, we can use the Android graphical designer.
In the MainActivity class add the following constants.

Now, invoke the authentication process then save the result to authResult variable.

Finally, override the OnActivityResult method to get the authentication result.

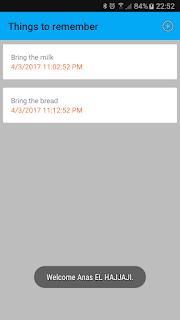
Below some screenshots.
 

Complete source code can be found on Github.

See you soon!

Monday, March 27, 2017

Hands on Xamarin Platform Pipeline - Develop - Let's start by an offline application

After configuring the development environment following the previous post.

Now, we'll be able to start developing mobile applications using Xamarin Platform.
In this post we'll start by creating the offline version of our "Remember It" application.

Application Creation

Open Xamarin Studio IDE, please note that I'm using dark theme because I'm fan of it and the default theme that comes after fresh Xamarin installation is the light theme.
Click on "New Solution..." button then select Android App.
Fill in the application Name, Organization Identifier. For the Target Platform I chose 'Maximum Compatibility' to cover multiple Android versions (since 2.3), and finally I chose AppCompat Light theme to bring Material Design to my Android application. 
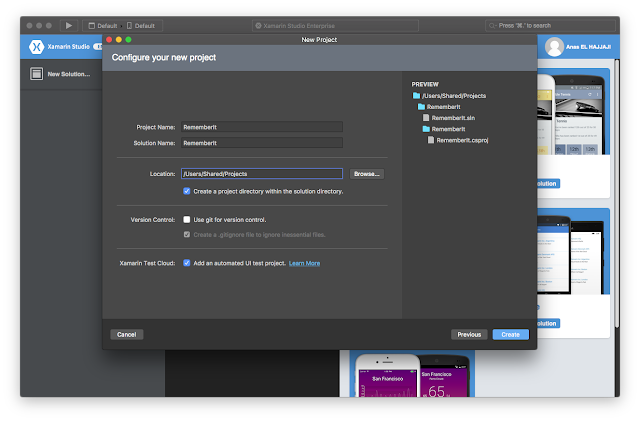
In the final step, we can set the project name, the solution name and the project location. I checked the Xamarin Test Cloud option in order to create UI Test project that we'll use after.
If you're getting build errors related to styles and theme, just make sure that Android Support V4 and V7 are correctly installed. Double click on Packages section within the project and add Android Support V4 and V7 as described bellow.
Now, the application should be built without any problem.

Android Emulator Creation

In Tools menu we can open the Google Emulator Manager.
Let's create a Nexus 6 emulator by filling some information about the device, choosing x86_64 as CPU is only to have faster emulator.
Now, we should be able to deploy applications to the created device.
We can start the device to verify whether it's working correctly.

Deploy the application to the device

Just select the new created device.
And push Play button, we'll get the Xamarin Hello World Application.
We can also put some breakpoints in the code to debug.

Create Login Screen

We can use the Android graphical designer to place UI components and change their properties.
Let's create the activity that will hold the list and come after the login step.

Create the corresponding empty layout for the moment.

Now, once we click on 'LOGIN' button in Login screen, we should be able to go to the new created activity, the Main activity shall become as follows:

At this stage, we'll have the login screen as follows and once we click on login button we should be able to go to an empty screen.

Add toolbar and plus menu button to add elements

You can notice that the RememberListActivity does not contain the toolbar, let's add it.

First, we need to define some material colors and the theme under Resources/values/Styles.xml

And material colors in Resources/values/Colors.xml

Finally, modify the Android manifest (Properties/AndroidManifest.xml) to choose the new theme.


The toolbar can be added to the view in RememberList.axml

Now, create the menu in Resources/menu/MainMenu.xml

And, do some adjustments in the RememberListActivity

Deploy and...

Create the "Remember It" list

We will use the Android RecyclerView and CardView, so we need to add the two components to the project.
The RememberList layout will become:

Now, let's populate the recycler view and for this we'll start by creating the model class.

Then, the RecyclerView element layout where we'll add our CardView.

We can also use the Android graphical designer for this.


We're almost done, we only need to update our activity to add the Adapter and the view holder.

Deploy and...

Be able to add manually some "Remember It" elements

For this we need a dialog and to update the activity after pushing CREATE button.

And finally, update the RememberListActivity.

Deploy and...
Full source code can be found on Github.

See you soon...


Hands on Xamarin Platform Pipeline - Context & Environment Description

Hands on Xamarin Platform Pipeline - Context & Environment Description

If you haven’t read this post yet, please do before reading this one.

Before starting the development, some preparations need to be performed and the main tasks are:

  •  Knowing the application requirements
  • Define the technology stack
  • Install and configure the environment

In our case, for the Operating System, Mac OSX Sierra will be used but there is no big difference between Xamarin on Mac and Xamarin on Windows.

For the mobile application, it will be a simple Android application (Xamarin Traditional Approach or Xamarin Native) and it will be called 'Remember It'. In the main screen we'll have a list of things to remember with possibility to add elements and attach an alarm on them, the elements are saved in Azure backend. An authentication will be mandatory before displaying the list.

To get start using Xamarin is pretty easy, following is the description of what I have in my environment:

  • I'll be using my MSDN Enterprise license to use all the Xamarin Platform, Xamarin Community Edition (or trial mode) can be used to perform to develop and build at least
  • Android SDK (eventually NDK) installed
  • Xamarin components installed: Xamarin IDE and Xamarin.Android (Xamarin installation)
  • Xamarin Profiler and Xamarin Test Recorder
  • For the backend, we'll use Visual Studio Mobile Center for Identity, Database, Crash reports and Analytics

Monday, January 18, 2016

Android Tutorial: Use LeakCanary to detect memory leaks

Overview

The memory leak can be a headache to detect and to resolve, small memory leaks can be hidden and may be seen after a long usage of the application and hunting memory leaks is not a simple task.
In this tutorial we will create a leaked application and we will use the LeakCanary library to detect the memory leak.

Step 1: add the LeakCanary dependency to the application

Modify the app/build.gradle to add the LeakCanary dependency as follows:

Step 2: Extend and configure the Application class

We need to call LeakCanary.install in onCreate method:

Step 3: Create a leaked activity

For this we will create a singleton class that saves the context:

Then, the main activity (leaked one), will use the singleton and then we'll go to a new activity:

Then, in the new activity we'll call System.gc to force the garbage collector in order to accelerate the analysis.

Step 4: Retrieve the analysis result

A nice notification can be shown:

The result can be retrieved from logcat:

Source code

Complete source code of the sample can be found in Github.
Complete documentation of LeakCanary can be found in the following links:
https://corner.squareup.com/2015/05/leak-canary.html
https://github.com/square/leakcanary


Saturday, January 16, 2016

Android UI/Application Monkey test

Android UI/Application Monkey test

Overview

The Monkey is a command-line tool that can be ran on any emulator instance or on a device. It sends a pseudo-random stream of user events into the system, which acts as a stress test on the application software.

The Monkey includes a number of options, but they break down into four primary categories:
  • Basic configuration options, such as setting the number of events to attempt.
  • Operational constraints, such as restricting the test to a single package.
  • Event types and frequencies.
  • Debugging options.
When the Monkey runs, it generates events and sends them to the system. It also watchesthe system under test and looks for three conditions, which it treats specially:
  • If the Monkey was configures to run in one or more specific packages, it watches for attempts to navigate to any other packages, and blocks them.
  • If the application crashes or receives any sort of unhandled exception, the Monkey will stop and report the error.
  • If the application generates an application not responding error, the Monkey will stop and report the error.

Usage

The syntax is:

The command options can be found in the official documentation.

Here is an example:


Wednesday, January 13, 2016

Dump the Android application heap if an out of memory crash occured

Dump the Android application heap if an out of memory crash occured

Solution overview

The idea is to store the application heap if an out of memory error happens. The HPROF file can be then analyzed using Eclipse Memory Analyzer Tool that I will present later.

Step 1: Create a class that implements Thread.UncaughtExceptionHandler

The implemented method uncaughtException will check if the exception is out of memory and if it's the case, the HPROF file will be dumped in the device storage.

Step 2: Set the uncaught exception handler the thread we want to create the heap dump

It's very sample, we can either set the uncaught exception handler to the main thread:

Or, to any running thread:

Step 3: Create a memory leaked code to invoke an out of memory exception

For example, by doing:

Step 4: Analyze the HPROF file to fix the memory leak

Eclipse Memory Analyzer tool can be used to analyze the dumped heap, I will present the method in a separate article.

Source code

The Activity code is the following and the sample source code can be found on Github.