Android Web View tutorial - Hallo sahabat Google Android Developer Tutorial, Pada Artikel yang anda baca kali ini dengan judul Android Web View tutorial, kami telah mempersiapkan artikel ini dengan baik untuk anda baca dan ambil informasi didalamnya. mudah-mudahan isi postingan
Artikel Web view tutorial, yang kami tulis ini dapat anda pahami. baiklah, selamat membaca.
Judul : Android Web View tutorial
link : Android Web View tutorial


Figure 3 - The WebView displaying a web page

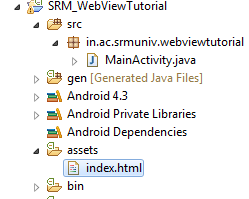 Figure 4- Displaying the content of a String which is HTML
Figure 5- Adding a HTML page in the assets folder

Figure 6 - Loading the HTML page using WebView
Anda sekarang membaca artikel Android Web View tutorial dengan alamat link https://googleandroiddevelopertutorial.blogspot.com/2012/09/android-web-view-tutorial.html
Judul : Android Web View tutorial
link : Android Web View tutorial
Android Web View tutorial
Android WebView Tutorial
If you want to deliver a web application (or just a web page) as a part of a client application, you can do it using WebView. The WebView class is an extension of Android's View class that allows you to display web pages as a part of your activity layout. It does not include any features of a fully developed web browser, such as navigation controls or an address bar. All that WebView does, by default, is show a web page.
A common scenario in which using WebView is helpful is when you want to provide information in your application that you might need to update, such as an end-user agreement or a user guide. Within your Android application, you can create an Activity that contains a WebView, then use that to display your document that's hosted online.
Another scenario in which WebView can help is if your application provides data to the user that always requires an Internet connection to retrieve data, such as email. In this case, you might find that it's easier to build a WebView in your Android application that shows a web page with all the user data, rather than performing a network request, then parsing the data and rendering it in an Android layout. Instead, you can design a web page that's tailored for Android devices and then implement a WebView in your Android application that loads the web page.
The Demonstrative project portrays usage of WebView by displaying webpage through a internet link,HTML content in program code and HTML web page in application assets folder.
1.Create Android project with details as listed in table below
Property name | Property value |
Project name | SRM_WebViewTutorial |
Package name | in.ac.srmuniv.webviewtutorial |
Activity name | MainActivity |
Layout xml name | activity_main |
2.Copy the code to the file webview.xml in res/layout folder
<?xml version="1.0"encoding="utf-8"?>
<LinearLayout xmlns:android="http://schemas.android.com/apk/res/android"
android:layout_width="fill_parent"
android:layout_height="fill_parent"
android:orientation="vertical" >
<WebView
android:id="@+id/webview1"
android:layout_width="wrap_content"
android:layout_height="wrap_content"
android:text="Hello, world!" />
</LinearLayout>
3.Copy the code in MainActivity.java. Activity.
packagein.ac.srmuniv.webviewtutorial;
importandroid.app.Activity;
import android.os.Bundle;
importandroid.webkit.WebView;
public class MainActivity extends Activity {
/** Called when the activity is first created. */
@Override
public void onCreate(Bundle savedInstanceState) {
super.onCreate(savedInstanceState);
setContentView(R.layout.activity_main);
WebView wv = (WebView) findViewById(R.id.webview1);
// wv.loadUrl("http://www.srmuniv.ac.in");
wv.loadUrl("file:///android_asset/index.html");
}
}
4. Modify the
AndroidManifest.xml file to register the new activity as well as to request for the INTERNET permission:<?xml version="1.0"encoding="utf-8"?>
<manifest xmlns:android="http://schemas.android.com/apk/res/android"
package="in.ac.srmuniv.webviewtutorial"
android:versionCode="1"
android:versionName="1.0" >
<uses-permission android:name="android.permission.INTERNET"/>
<uses-sdk
android:minSdkVersion="11"
android:targetSdkVersion="17" />
<application
android:allowBackup="true"
android:icon="@drawable/ic_launcher"
android:label="@string/app_name"
android:theme="@style/AppTheme" >
<activity
android:name=".MainActivity"
android:label="@string/app_name" >
<intent-filter>
<action android:name="android.intent.action.MAIN"/>
<category android:name="android.intent.category.LAUNCHER"/>
</intent-filter>
</activity>
</application>
</manifest>
5.Run the application on the Android emulator.
Figure 3 - The WebView displaying a web page
CODE EXPLANATION
For the WebView view to work, you need to add the INTERNET permission to the AndroidManifest.xml file.The loadUrl() method of the WebView class loads the page of a given URL.
6.Modify the code in onCreate() method of MainActivity,java WebView wv = (WebView) findViewById(R.id.webview1);
final String mimeType = "text/html";
final String encoding = "UTF-8";
String html = "<H1>SRM University</H1><body>" +
"<p> Welcomes you</p>"; wv.loadDataWithBaseURL("", html, mimeType, encoding, "");
7.Run the application on the Android emulator.
final String mimeType = "text/html";
final String encoding = "UTF-8";
String html = "<H1>SRM University</H1><body>" +
"<p> Welcomes you</p>"; wv.loadDataWithBaseURL("", html, mimeType, encoding, "");
7.Run the application on the Android emulator.
Figure 4- Displaying the content of a String which is HTML You can also dynamically formulate a HTML string and load it into the
WebView view, using the loadDataWithBaseURL()method. If you have static pages that you want to load directly from your project, you can save the HTML pages under the assets folder of your package. Figure 5 shows that assets folder being added with a page named i
ndex.html .Figure 5- Adding a HTML page in the assets folder
8.Create/Copy the html file in the assets folder
<h1>SRM University</h1>
<body>
<p>SRM UNIVERSITY welcomes you</p>
<img src='http://www.srmuniv.ac.in/nss/images/logo_srm.png'/>
</body>
9.Run the application on the Android emulator.Figure 6 - Loading the HTML page using WebView
CODE EXPLANATION
To load the WebView using the content stored in the
Index.html file, use the loadUrl() method as follows:WebView wv = (WebView) findViewById(R.id.webview1);
wv.loadUrl("file:///android_asset/Index.html");
Figure 6 shows the content loaded in the WebView view.Demikianlah Artikel Android Web View tutorial
Sekianlah artikel Android Web View tutorial kali ini, mudah-mudahan bisa memberi manfaat untuk anda semua. baiklah, sampai jumpa di postingan artikel lainnya.
Anda sekarang membaca artikel Android Web View tutorial dengan alamat link https://googleandroiddevelopertutorial.blogspot.com/2012/09/android-web-view-tutorial.html
Android Web View tutorial
4/
5
Oleh
Unknown


